

개요
이전 포스팅에서는 HTML, JavaScript API만으로 구글 로그인 버튼(Iframe)을 렌더링하여, 아주 간단하게 구글 소셜 로그인을 구현했었다. 하지만 버튼 UI 커스터마이징에 한계가 명확하여 서버 단에서만 Google OAuth2 API로 인증하고 버튼을 자유롭게 만들 수 있도록 구현하도록 한다.
구글 OAuth2 인증 단계
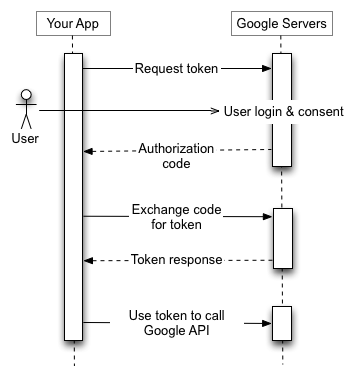
구글 OAuth2 인증 API는 말그대로 OAuth2 프로토콜을 사용하므로 위와 같은 인증 단계를 거친다.
1. 구글 로그인 화면으로 Redirect하여 인가를 요청한다. (Request token)
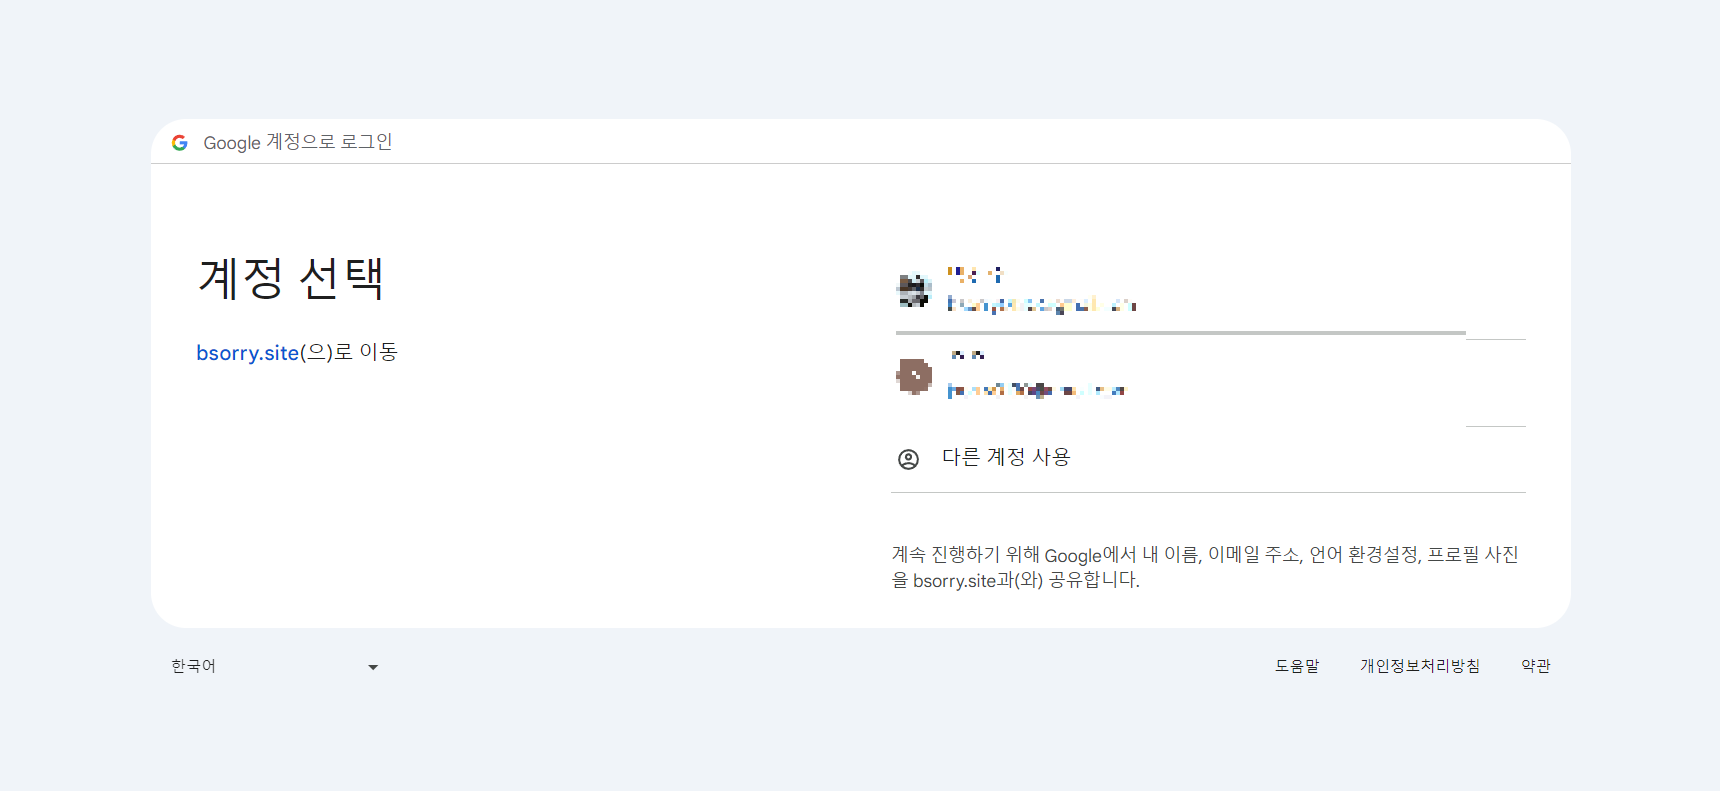
2. 사용자가 구글 로그인화면에서 로그인한다. (User -> User login & consent)
3. 성공적으로 로그인을 하면 인가 코드를 받는다. (Authorization code)
4. 받은 code로 token을 요청하고 받는다. (Exchange code for token , Token response)
5. 받은 token으로 사용자 정보를 요청한다. (Use token to call Google API)
인증 코드 받기 (Authorization code)
서버 측 웹 앱용 HTTP/REST API 공식 Docs
https://developers.google.com/identity/protocols/oauth2/web-server?hl=ko#httprest_2
위 링크에서 REST API로 구글 로그인 인증을 하는 방법이 자세히 설명되어있다. 가장 먼저 구글 로그인 창을 띄우는 URL로 Redirect 시킨다.
https://accounts.google.com/o/oauth2/v2/auth? scope=https%3A//www.googleapis.com/auth/drive.metadata.readonly& access_type=offline& include_granted_scopes=true& response_type=code& state=state_parameter_passthrough_value& redirect_uri=https%3A//oauth2.example.com/code& client_id=client_id
위 URL은 예시 URL로서 필수 파라미터(clident_id 등)와 선택 파라미터에 대한 설명은 공식 Docs에 표기되어있다.
    @GetMapping("/{type}/google/auth")
    public String loginUrlGoogle(@PathVariable("type") String type){
        String loginUrl = "https://accounts.google.com/o/oauth2/v2/auth?"
        		+"client_id=" + googleClientId
        		+ "&redirect_uri="+server+"/"+type+"/google/access"
        		+ "&response_type=code"
        		+ "&scope=email%20profile%20openid"
        		+ "&access_type=offline"
        		+ "&prompt=select_account";

        return "redirect:" + loginUrl;
    }
Docs를 참고하여 위 컨트롤러 코드를 통해 /login/google/auth URL에 접근하면 구글 소셜 로그인 화면으로 Redirect하도록 구현했다. 이로써 /login/google/auth URL에 접근하게만 하면 되므로 자유롭게 버튼 UI를 디자인할 수 있다. 주의할 것은 redirect_uri 파라미터의 값은 client_id를 가져왔던 GCP 프로젝트의 API 및 서비스 -> 사용자 인증 정보 -> OAuth 2.0 Client ID -> 승인된 리디렉션 URI 항목에 등록된 URL이어야한다.
https://oauth2.example.com/auth?code=4/P7q7W91a-oMsCeLvIaQm6bTrgtp7
사용자가 구글 로그인 화면에서 계정을 선택하고 로그인에 성공하면, 위 예시 응답코드와 같이 rediect_uri에 등록했던 URL로 Redirect하게 된다. 이때 code 파라미터(Authorization code)를 통해 값을 받게되는데 이것을 이용해 구글 사용자 정보에 접근할 수 있는 id_token을 받을 수 있다.
Token 받기
@Data
@Builder
public class GoogleRequest {
    private String code;
    private String clientId;
    private String clientSecret;
    private String redirectUri;
    private String grantType;
}
GoogleRequest DTO
@Data
@NoArgsConstructor
public class GoogleResponse {
    private String access_token;
    private String expires_in;
    private String refresh_token;
    private String scope;
    private String token_type;
    private String id_token;
}
GoogleResponse DTO
@Data
@NoArgsConstructor
public class GoogleInfResponse {
    private String iss;
    private String azp;
    private String aud;
    private String sub;
    private String email;
    private String email_verified;
    private String at_hash;
    private String name;
    private String picture;
    private String given_name;
    private String family_name;
    private String locale;
    private String iat;
    private String exp;
    private String alg;
    private String kid;
    private String typ;
}
GoogleInfResponse DTO
    @GetMapping("/login/google/access")
    public String loginGoogle(String code,
            HttpServletRequest request,
            HttpServletResponse response){
        try {
            ResponseEntity<GoogleInfResponse> resultEntity =
                    googleOAuthService.getGoogleUserInfo(code, "login", googleClientId, googleClientSecret, server);
.
.
.
Redirect URI 컨트롤러
@Service
public class GoogleOAuthService {

    public ResponseEntity<GoogleInfResponse> getGoogleUserInfo(String code, String type,
            String id, String secret, String server) {
        RestTemplate restTemplate = new RestTemplate();
        GoogleRequest googleOAuthRequestParam = GoogleRequest
                .builder()
                .code(code)
                .clientId(id)
                .clientSecret(secret)
                .redirectUri(server + "/"+type+"/google/access")
                .grantType("authorization_code").build();

        // Request a Google access token
        ResponseEntity<GoogleResponse> tokenEntity =
        		restTemplate.postForEntity("https://oauth2.googleapis.com/token", googleOAuthRequestParam, GoogleResponse.class);

        String idToken = tokenEntity.getBody().getId_token();

        Map<String, String> map = new HashMap<>();
        map.put("id_token",idToken);

        // Request a Google User Info with access token
        ResponseEntity<GoogleInfResponse> infoEntity =
                restTemplate.postForEntity("https://oauth2.googleapis.com/tokeninfo", map, GoogleInfResponse.class);

        return infoEntity;
    }
}
Google API 서비스
POST /token HTTP/1.1
Host: oauth2.googleapis.com
Content-Type: application/x-www-form-urlencoded
code=4/P7q7W91a-oMsCeLvIaQm6bTrgtp7&
client_id=your_client_id&
client_secret=your_client_secret&
redirect_uri=https%3A//oauth2.example.com/code&
grant_type=authorization_code
token 요청 예시
https://oauth2.googleapis.com/tokeninfo?id_token=XYZ123
token info 요청 예시
위와 같이 요청/응답에 관한 DTO를 구성하고, redirect_uri에 대한 Controller와 구글 API를 요청하고 응답받는 Service를 구현한다.
1. GoogleRequest DTO에 redirect_uri로 받는 code와 그 외 파라미터를 설정하고 구글 API에 token을 요청한다.
2. 응답으로 받은 GoogleResponse의 id_token 값만 HashMap으로 매핑하여 구글 API에 token info를 요청한다.
3. token info로 받은 사용자 정보(email, name, picture 등)는 GoogleInfResponse에 매핑된다.
4. 이후 GoogleInfResponse의 사용자 정보를 이용해 회원가입 및 로그인 처리를 구현한다.
추가로 token 이미 jwt token으로 사용자 정보를 담고 있기 때문에, token info를 요청하지 않아도 decode 로직을 따로 구현하면 사용자 정보를 사용할 수 있다.
token 요청 참조 Docs
https://developers.google.com/identity/protocols/oauth2/web-server?hl=ko#httprest_3
token info 요청 참조 Docs
https://developers.google.com/identity/sign-in/web/backend-auth?hl=ko#calling-the-tokeninfo-endpoint
'토이 프로젝트 > 게시판 웹' 카테고리의 다른 글
| [Spring Boot] Google 소셜 로그인: 가장 쉽게 구현하기(HTML, JavaScript API) - 게시판 웹 (0) | 2024.03.18 |
|---|---|
| [Spring Boot] Google 소셜 로그인: GCP 사전 설정 - 게시판 웹 (1) | 2024.03.16 |
| [Spring Boot] Thymeleaf와 JSP 동시에 쓰기 - 게시판 웹 (0) | 2024.03.14 |
| [Spring Boot] 2.MariaDB 구성 - 게시판 웹 (0) | 2024.02.28 |
| [Spring Boot] 1.MariaDB 설치 - 게시판 웹 (0) | 2024.02.18 |